Tuesday, November 23, 2010

DIY Vintage Christmas Blocks!!

I'm soo excited to share this project with you! I think they came out great and I LOVE them!!  My grandfather made my mom a set for her house that read "Merry Christmas" and he used wooden letters and paint for his.  This is a different version I created for my love of vintage sheet music.  Enjoy!

Here's a sneak peek before we begin:


Materials you will need:

Two 3x3 wood pieces (or premade blocks)

Wood Stain

Some sort of saw (if you are cutting your own blocks)

Vintage sheet music

ModPodge (I used satin finish)

Hot Glue Gun

Distress Ink (avail. at AC Moore or Michael's)

Glittery letters (or you can stencil them)

Step 1:

First, stain the wood in the color of your choice.  I chose to go with a "redder" stain because I was only doing two coats and wanted it to have richer color.  I found this spray paint-like stain, which I immediately scooped up!


Very easy to use and coated really nicely...


Now, let the wood dry and apply another coat if needed


My dad helped me stain them and we hung them from a nail while spraying


After the wood dried, my dad cut the wood into 2.5" blocks.  Sorry no pics, but my dad was a trooper - there were a lot of them! Thanks Dad!! I needed 13 blocks to spell out "Joy to the World", but obviously count your blocks needed to create whatever saying you are using.  I also had extra blocks incase there were a few mistakes (or for a future project!)


We lightly sanded the edges where the cut was to make sure there would be no splintering.  

Step 2:

After the blocks were dried and cut (there were a few days in between this), I measured the blocks on the vintage sheet music and lightly traced around the edge.  If you are wondering where to get vintage sheet music, Ebay is a great place to look.  I got 5 books of sheet music for around $6.  


After I traced around the block, I ripped the page lightly all around to create the torn look.  Little did I know, I was tearing through two pages which ended up being a time saver!  I would definitely recommend tearing two pages together to create two little squares.  


Then, fit it onto the block and rip any little pieces that do not fit along the edges.


Now, time to use your distress ink.  The pages were slightly yellowed already, but I wanted to add a more vintage feel. 


Lightly press the page onto the ink pad...


Then, use your ModPodge to glue the paper to the block.  I also used the ink on the blocks around the edges to make sure the whole block looks stained.  You could take the time to stain each side, but I just stained the entire wood piece then cut, leaving two sides without stain...you won't see the back right ? ;)


Apply ModPodge in a thin layer

Place the sheet music onto the top of the block covered in ModPodge

Now do the same thing to the other blocks...


When they are all done, put a light coat of ModPodge over the top of each block to seal the sheet music on.  This also made the paper a little darker which I liked. 

Annabelle guarded the music just incase ;)


Step 3:

Pick out your letters and place them on your blocks accordingly.  Before I placed the letters, because I have OCD I made sure that the blocks lined up nicely, trying to create a nice flow from block to block with the way the music looked.  


Once the letters are lined up to your liking, or to satisfy your OCD like me ;) use your glue gun to attach the letters to the blocks. 


The "W" was a little too big with the swirly part, so I cut off a little then glued it back together to make the swirl shorter.


Step 4:

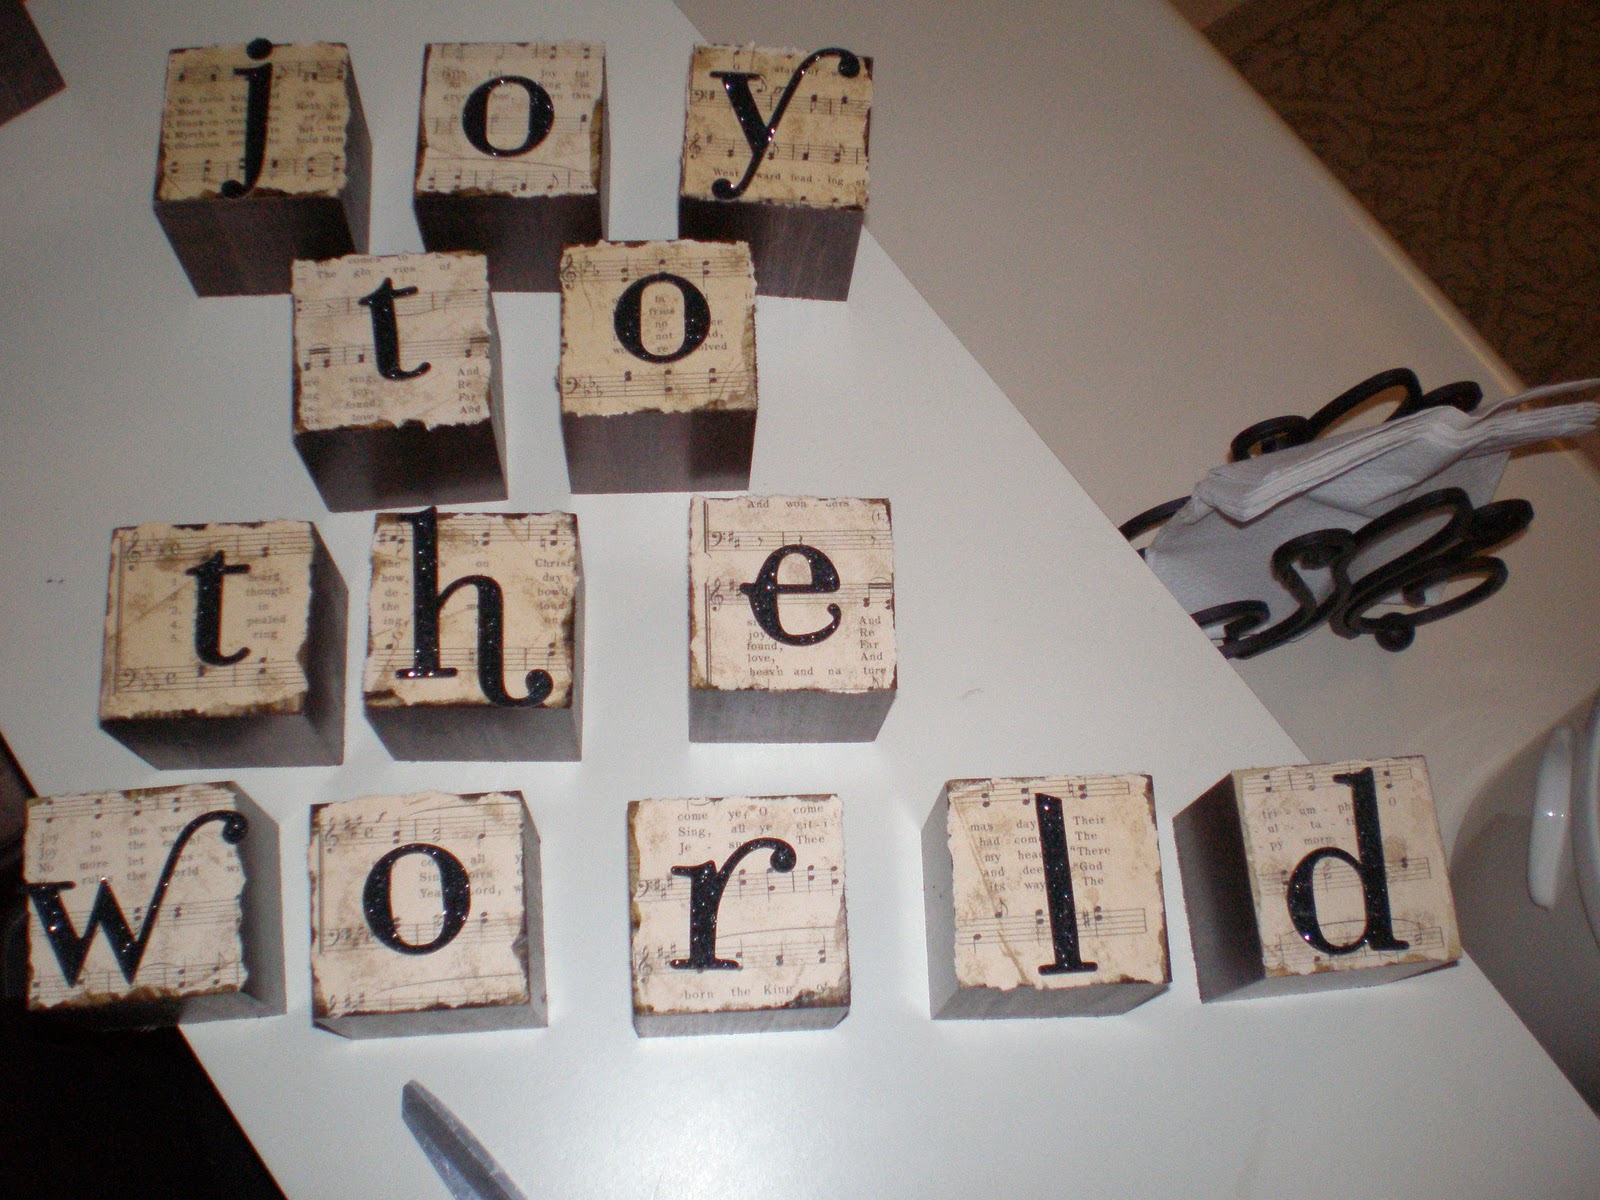
Show off your hard work! I am obsessed with these...I mean true love...

I put them in my hutch to see how they would look...don't mind the fall stuff...it's all coming down this weekend to put up Christmas!!


again...


from the side...


another...


and another way...


I absolutely love them & I hope you do too! I'd love to see if you make your own version!


Monday, November 22, 2010

Silhouette Giveaway!

Thrifty Decor Chick (one of my fav blogs!) just posted a Silhouette giveaway...a $299 value...yowzazzz!!  She has made so many cute things with hers...head on over here to enter!  I would love love love to win this!

Silhouette SD Digital Craft Cutting Tool (Silhouette)


My New Life

Check out this video from Stephanie Nielson, airplane crash survivor. It's so inspiring to watch...


Sunday, November 14, 2010

DIY Burlap Christmas Stockings

I've seen so many homemade stockings lately that I wanted to make my own.  By no means am I a "sewer"... meaning I've never maybe once picked up a needle and thread.  That being said, this tutorial is filled with step-by-step pictures for those of you like me :)  My grandma helped me with this project, therefore, you will see grandma-hands throughout:)

I forgot to take a picture of the materials you will need, but depending on how many you will be making your fabric length will vary.  I bought 1 yard of burlap-type fabric, 1/2 a yard of fuzzy fabric for the top and 1/2 a yard of felt for the lining. I should have bought a little more felt, but it ended up working out by patching the lining.

Here we go...

First, create a template of a stocking.  I chose to go bigger because you will have to turn the fabric inside out to start, so it will lose some of it's size when you are all finished.

I traced along the folded side to start.
Second, I cut out the traced stocking and squared the edge.


Next, I placed the stocking on doubled up felt {cut once = two pieces} and as I said before, I should have gotten more felt, but this was a remnant so it didn't quite fit the tip of the stocking...


So we used the scrapes and pieced it together to create the whole lining, first by measuring how much scrape we needed...


Then piecing the scrapes together and sewing them like this:


Next, we lined up the felt into the burlap {the reason I chose felt was because it would give the burlap some body to hold the stocking shape}


Then the sewing process began...


And ended up like this:

We went all the way to the edge of the burlap, unfortunately the felt didn't fit the entire tip, but that's ok we're first timers! ;)


After the sewing was done, we flipped it back from being inside out.  Now, I can never explain that correctly...inside in, outside out...whatev you get the idea :)

For some reason, this picture refuses to rotate...


Anyway, this is what it looks like when it's all sewn and lined.

Next step...the furry top!  This was interesting... first, we rolled it over to create a cuff then tried to sew it together.  


After the sewing machine refused to sew after fifteen  a bunch of tries, we gave up and started to hand sew it.  Thanks to Grandma for having patience!  Both the burlap and furry fabric needed to be sewn by hand at that point.

The hand sewing I did on my own, that's why it looks exactly like I did it on my own :)

I sewed the frayed edge into the cuff like this:


Then pinned the furry fabric on using bright pins...easy to see that way


and went to work...


I had a little helper the whole time too:


Here is the sewn product:


Now for some accessories, I tried little hanging ornaments, glittery snowflakes, etc and ended up with a simple bow:


added a little loop for hanging...


and there you have it!  Not too bad for a first-timer...I love it!


and again...


Hope you enjoyed & can use this tutorial!  

I'm linking to:


Funky Junk's Saturday Nite Special


Blogger template designed By The Sunday Studio.