Monday, November 22, 2010
Silhouette Giveaway!
Thrifty Decor Chick (one of my fav blogs!) just posted a Silhouette giveaway...a $299 value...yowzazzz!! She has made so many cute things with hers...head on over here to enter! I would love love love to win this!

Sunday, November 14, 2010
DIY Burlap Christmas Stockings
I've seen so many homemade stockings lately that I wanted to make my own. By no means am I a "sewer"... meaning I've never maybe once picked up a needle and thread. That being said, this tutorial is filled with step-by-step pictures for those of you like me :) My grandma helped me with this project, therefore, you will see grandma-hands throughout:)
I forgot to take a picture of the materials you will need, but depending on how many you will be making your fabric length will vary. I bought 1 yard of burlap-type fabric, 1/2 a yard of fuzzy fabric for the top and 1/2 a yard of felt for the lining. I should have bought a little more felt, but it ended up working out by patching the lining.
Here we go...
First, create a template of a stocking. I chose to go bigger because you will have to turn the fabric inside out to start, so it will lose some of it's size when you are all finished.
Second, I cut out the traced stocking and squared the edge.

I forgot to take a picture of the materials you will need, but depending on how many you will be making your fabric length will vary. I bought 1 yard of burlap-type fabric, 1/2 a yard of fuzzy fabric for the top and 1/2 a yard of felt for the lining. I should have bought a little more felt, but it ended up working out by patching the lining.
Here we go...
First, create a template of a stocking. I chose to go bigger because you will have to turn the fabric inside out to start, so it will lose some of it's size when you are all finished.
 |
| I traced along the folded side to start. |
Next, I placed the stocking on doubled up felt {cut once = two pieces} and as I said before, I should have gotten more felt, but this was a remnant so it didn't quite fit the tip of the stocking...
So we used the scrapes and pieced it together to create the whole lining, first by measuring how much scrape we needed...
Then piecing the scrapes together and sewing them like this:
Next, we lined up the felt into the burlap {the reason I chose felt was because it would give the burlap some body to hold the stocking shape}
Then the sewing process began...
And ended up like this:
Thursday, November 11, 2010
Super easy sparkly Christmas candles!
I've been drooling over all of the Christmas ads, magazines, etc lately and I've been seeing these lovely candles everywhere:

...for $15, seriously?? I love them but $15 for a candle!
Anyway, I knew I could make them myself super cheap and equally sparkly :)
Here's what you need to make your own:
I'm sure you can find the candles from the Dollar Store, Target, etc. I got mine from Ikea as a set.
Now on to the directions:
1. Coat part of the candle with glue (I used my finger to spread it, if you don't like being sticky use a brush) and sprinkle some glitter
2. Add more glue around the candle and sprinkle all the way around. Try to keep an even line around...if it is slightly uneven run your finger across the top to even out
Here's what it looks like compared to the plain one...I looove sparkles
I did the next one with all silver sparkles...
Bright & Sparkly
There you go! Total cost: under $5...I'd love to see if you try this sparkly project!
Monday, November 8, 2010
Pumpkin Espresso Muffins
So I wanted to try this yummy recipe I found online (I can't remember where, thanks to whoevers recipe this is!) for Pumpkin Espresso Muffins...mmm.
Here's what you'll need:

Here's what you'll need:
2 cups of flour
1 cup of sugar
2 tsp. baking powder
½ tsp. salt
2 tsp. of cinnamon
2 tsp. espresso powder
2 eggs
1 can of canned pumpkin
1 cup of milk
½ cup vegetable oil
¾ cup of chocolate chips
Espresso sugar (optional)
§ Mix dry ingredients together, gradually add wet ingredients.
§ Stir until all ingredients are incorporated.
§ Fill muffin cups 2/3 of the way (I use a cookie dough scoop)
§ Sprinkle espresso sugar on top.
§ Bake at 350 degrees for 24-25 mins.
And....unfortunately, I was too busy tasting these little treats forgot to take an after-baked picture :)
Enjoy!!
Friday, November 5, 2010
Christmas Eye Candy
There are so many inspiring Christmas pictures out there I thought I would share some of my favs with you!
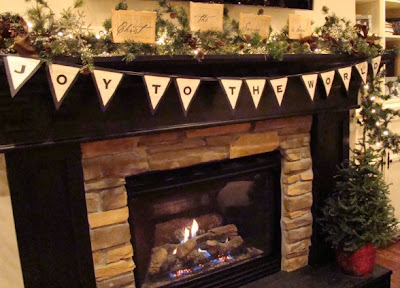
This mantle is rustic & beautiful...

This mantle is rustic & beautiful...
I cannot wait to make this pretty pillow from Tatertots and Jello
I looove this banner, I'm going to recreate this and make it my own using wooden blocks {check back soon for tutorial!}
I'm also making our stockings this year, similar to these lovely ones:
And this is inspiration for my Christmas Eve dinner tablescape...
Thats it for now, before I have the urge to run to the store to start decorating!! Enjoy your evening!
Thursday, November 4, 2010
Silhouette Machine
Subscribe to:
Comments (Atom)


