a Rafflecopter giveaway
Congratulations, Ashley M! Please check your email!! Thank you all so much for entering...check back during the week for a great "mommy" giveaway!
Tuesday, December 9, 2014


Sunday, December 7, 2014
Sunday Supper || Creamy Meatball Casserole
After a busy day, it's always nice to have an easy dinner recipe that can be thrown together quickly and tastes delicious. I adapted this recipe from different recipes on Pinterest and it was so good! I used homemade meatballs and sauce, but you can certainly use frozen meatballs and jarred sauce to save even more time!


Ingredients:
1 loaf of crusty bread cut into cubes(I used Italian)
1 lb (or more) of cooked meatballs
1 jar, or about 4 cups of homemade sauce
1 block of cream cheese
1/2 cup of mayonnaise
1/2 cup of Greek yogurt
2 cups of shredded mozzarella cheese
1 tsp. of Italian seasoning (basil, oregano, thyme)
Preheat oven to 350. Mix together the cream cheese, yogurt, mayo and about 1/2 cup of mozzarella cheese. Sprinkle in the Italian seasoning and set to the side. Place bread cubes in the bottom of a casserole dish and place in the oven to toast slightly for a few minutes. After bread cubes have toasted, spread the cream cheese mixture over the bread and then layer with meatballs. Spread sauce over the meatballs and sprinkle with shredded cheese. Cook for about 20 minutes or until lightly browned and bubbly.
Easy, right? I served mine with a green salad. It was a quick and easy recipe that my whole family loved. Here is how I make my meatballs, if you'd like to try with homemade meatballs:
1 lb. of ground beef (I use certified Angus)
1 egg
1 slice of bread soaked in milk
1/2 cup bread crumbs
Fresh parsley
Parmesan cheese
Salt & Pepper
Mix together milk soaked bread (squeeze excess milk out if needed), bread crumbs, salt, pepper, cheese. Add egg and ground beef, mix together until all ingredients are incorporated. Add fresh chopped parsley. Form meat mixture into small meatballs - I use a mini cookie scoop for even sizes. Bake at 350 for about 35-45 minutes depending on size, or until golden brown and cooked through.
I hope you enjoy this recipe! Let me know if you try it!
**Don't forget to enter the current giveaway to BYOImagination going on here: Wooden Toy Giveaway!
Friday, December 5, 2014
Shop Feature || BYOImagination Review & Giveaway

I am so excited to share today's shop feature with you! BYOImagination is an Etsy shop featuring wooden toys. These pieces are seriously amazing! They are so life-like you'll do a double take. The attention to detail is just amazing. I tend to give Olivia wooden toys, as opposed to plastic when I can, so I was so excited when I found this shop. The materials used to create the toys include beeswax, olive oil, non toxic sealant, non toxic paint and wood, making it perfect for worry free playtime with little one's who like to sample their toys ;) I asked Megan to provide some background into her shop...read along to find out more!
BYOImagination, LLC officially started in March of 2013. During the holiday season of 2012, my fiancé was away for the military (he is a US Marine) and I had limited funds to dedicate to Christmas for our two children after having to temporarily lower my hours at my hospital job. So, I ended up making all of their gifts that year. The items I created had gained a lot of attention from friends and family, so I decided to share select items with others; thus, open BYOImagination, LLC! To be honest, I love food and playing kitchen/restaurant with my little ones, so I have just decided to run with the play food creations at this time. As far as the name, BYOImagination, I am continuously telling my children to use their imagination when it comes to everything. I believe that it is important to "bring your own imagination" into every situation as long as life will allow it! I know I am a child at heart and I love it. All of my creations are made in a pet and smoke free home. The items are all made out of wood, non toxic paints, and mediums. They are made as close to "real food" size as possible. The shop currently offers items ranging from $5.00 - $42.00


Seriously, how amazing right?! I was sent the waffle and fruit set and I cannot express how impressed I am by the attention to detail and how "real" it is! Olivia is getting a kitchen from Santa and I cannot wait to see her play with this set in her kitchen! Everything from the packaging (truly packed with care) to the little seeds on the strawberries...I can't say enough about this shop! To check it out yourself, BYOImagination can be found at the following:
Instagram: @byoimagination
Website: www.etsy.com/shop/BYOImagination
Facebook: BYOImagination, LLC
Twitter: BYOImagination @ByoMegan
Now, here comes the exciting part! Megan has generously offered to give one of you lucky readers a pancake and waffle set of your own!!


So exciting, right?! I can't wait for you to see these products for yourself! The giveaway will end Monday, December 8 at 11:59PM. Winner will be chosen and announced Tuesday morning. Winner will have 24 hours to respond, if no response, another winner will be chosen. Best of luck to you all!!
*Note: All entries will be checked for authenticity*
a Rafflecopter giveaway
*Disclaimer: BYOImagination is currently on a holiday break. Please check their Etsy shop for details as to when shop will reopen for new orders. Chosen winner will need to provide an address for waffle and pancake set to be shipped directly*
Tuesday, December 2, 2014
Olivia: 19 Months
I cannot believe Olivia is 19 months already. That is so close to two that I don't even want to think about it! She is constantly on the move and is learning so much everyday. Her current phrase of the day is "no, no, no, no…" whenever I ask her something. "Do you want yogurt?" "No, no, no, no…" "Do you want to go outside?" "No, no, no, no…" It's hilarious, while mildly towards the end of the day stop-saying-no-to-everything-before-I-go-crazy style. She is just the sweetest little girl, constantly saying I love you or "I ya you" - Livvy style.

Favorite Phrases (Livvy Style):
No, no, no, no…
I ya you (I love you)
Dis? Dis? Dis? (This, pointing at everything)
Mommy, mommy, mommy, mommy…
Daddy, daddy, daddy...
Yeahhhh
Good girl
Tank you
Ho, Ho, Ho
Peas (Please)
Animal Sounds:
Cow
Duck
Dog
Cat
Fish
Sheep
Monkey
Favorite Foods:
Raspberries
Green Beans
Olives
Avocado
Whipped Cream
Yogurt
Ice Cream
Loves to:
Read books
Color with crayons or colored pencils
Dance to music, especially Doc McStuffins & Taylor Swift
Collect rocks
Take baths
Swing outside
Wear Grandpa's giant headphones (Modern Family Phil style)
Play with bracelets and necklaces
Drink out of big girl cups
Clean up (serious baby OCD - like her momma)
Dislikes:
Potatoes
Trains
Chicken nuggets
Brownies (not my child?)
She really is such a little love! She has such a funny personality and constantly has everyone laughing. I'm so proud of how much she's learning and growing. I can't wait for this Christmas season to see how excited she is!
Monday, December 1, 2014
The Re-Play Tableware Winner Is...
a Rafflecopter giveaway
Congratulations to Stephanie P! Please keep your eye out for an email from The Birds Nest. Thank you all who participated! Check back on Friday for an amazing giveaway for BYOImagination wooden toys!
Congratulations to Stephanie P! Please keep your eye out for an email from The Birds Nest. Thank you all who participated! Check back on Friday for an amazing giveaway for BYOImagination wooden toys!
Wednesday, November 26, 2014
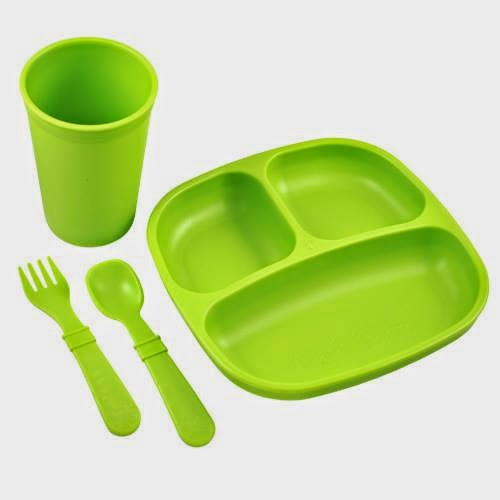
Shop Spotlight || Re-Play Tableware Review & Giveaway

Re-Play Products are made from recycled milk jugs! It's a better alternative for parents looking to make the planet a better place for their children as well as future generations.
Re-Play uses curbside collected HDPE plastic. The recycled plastic is sanitized using a patented, proprietary process that cleans the plastic and removes anything that was absorbed by the plastic. Our recycled plastic is FDA approved food grade material.
Our packaging is also made from recycled paperboard. The minimal package design does not use plastic blisters, twist ties or any other extra restraints that can create more waste.
Re-Play products reduce greenhouse gases and save energy!*
One pound of recycled plastic saves enough energy to:
• power a 60W lightbulb for 6 days
• charge a smartphone for 31 weeks
• power a 32" LCD TV for 3 days
• charge an electric car for 6 hours
Both the products and packaging are recyclable.


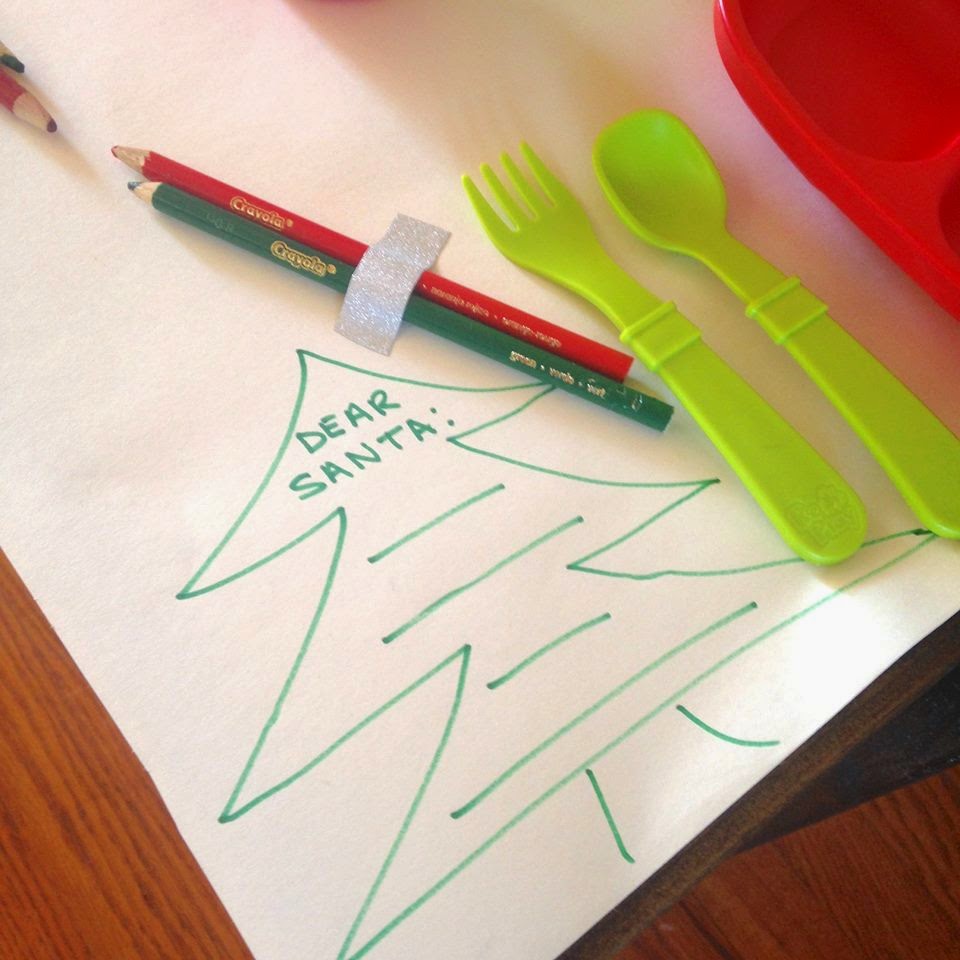
Making meal time fun is something I really enjoy doing for Olivia. I always try to make her food look appealing and fun, if possible. Trust me, there are days where its just Cheerios and a banana, but on the days that I have time I really enjoy creating fun meals. With the holiday season upon us I wanted to make something really festive for her so here are some fun, festive meals I'd like to share with you!

{Festive holiday kids table}

{Christmas kid's table, complete with a letter to Santa}

{Breakfast of snowman & Christmas tree pancakes, sliced grapes & blackberries, greek yogurt with holiday sprinkles, and snowy pine trees}
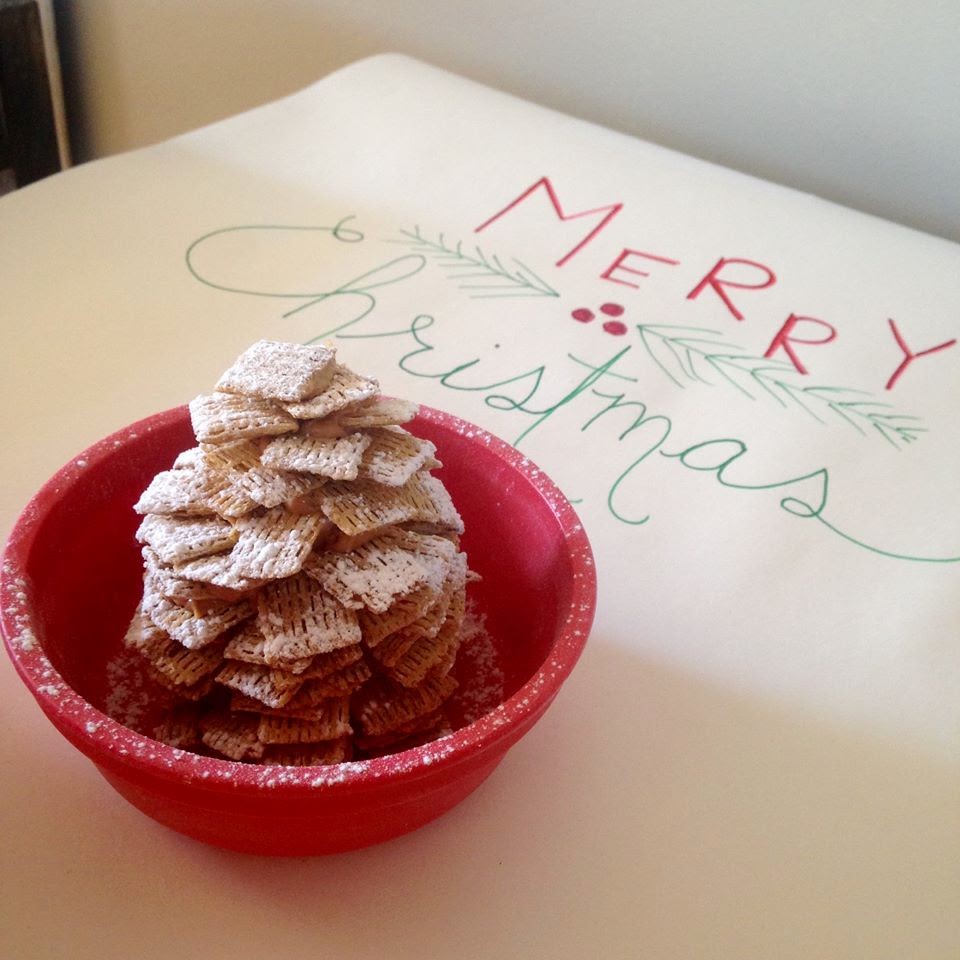
{Snowy pine trees - tutorial coming soon}

{Fried egg bites, avocado, and greek yogurt with pomegranate seeds}

{North Pole lunch, anyone?}


{Reindeer sandwich, grinch grapes & greek yogurt}
I had so much fun creating these festive meals! The Re-Play plates are perfect for toddlers, with deep sections to hold a variety of foods. The utensils are very sturdy and great for little hands. I can't say enough about Re-Play products. If you have little ones, you need to invest in some of these products! They are so afforable, as well. Re-Play products can be purchased through their website here. I purchased additional plates, bowls, and utensils at Walmart. Re-Play has generously offered to give away a green feeding set to one of you lucky winners!!! Giveaway ends Monday, Dec. 1 at 11:59pm. Winner will be announced Tuesday morning and will have 24 hrs to claim their prize. Good luck!!!
*I'm so sorry if some of you are experiencing difficulty viewing the Rafflecopter giveaway - please try viewing on a mobile device, as there is not a problem there. Working hard to get this fixed asap!*
Sunday, November 23, 2014
Sunday Supper || Delicious & Easy Tom Kha Gai Soup

Ingredients:
1 carton of Swanson Thai Infused Broth
1 carton of low sodium chicken stock (I always use organic)
2 cans of coconut milk (not light style)
1-2 cups of carrots (cut matchstick style)
Carton of mushrooms
Shredded chicken
1 package of Ramen noodles (noodles only, not season packet)
Lime wedges
Directions:
- Combine the Thai broth and chicken stock and heat over medium high heat.
- Add carrots and mushrooms
- Cook until carrots have softened, add shredded chicken and Ramen noodles. (I broke the noodles up slightly)
- Add two cans of coconut milk and stir until combined.
- Heat through until warm and bubbly
Serve with lime wedges. The squirt of lime really brightens it up!
Easy, right?! If you prefer not to use the Thai broth, you can use vegetable broth or chicken stock and add your own Thai ingredients (lemongrass, lime, ginger, etc) You could also throw this in the crockpot on low for a few hours, adding the mushrooms and coconut milk towards the last half hour or so. It is so good! Let me know if you try it!
Have a wonderful Sunday.
Friday, November 21, 2014
Shopping at Target with a Toddler || The Good, the Bad, and the Festive
I love Target and find myself there way too often. My sister and I always say that shopping with a toddler is literally so funny/exhausting because it is so chaotic and it's basically a game of keeping-toddler-happy-with-snacks-drinks-dollar-spot-toys-while-buying-nothing-on-your-list. Do you all feel like that??
This morning, I decided to take Olivia to Target to look at all of the fun Christmas items popping up, while of course doing some grocery and essentials shopping. Normally, Olivia loves shopping and it makes me so happy to share fun shopping days with her. I thought it might be fun to see if any of you have the same Target experience as me;)...
Step One: Decide to take your toddler to Target before naptime {insert monkey covering eyes emoji here}. Prep her with a big breakfast and get her excited to go with you!

Step Two: Prep your diaper bag with all of the essentials to make your shopping trip go smoothly...Cheerios, goldfish, raisins, snack trap with different goldfish, granola bar, water, mini book, light up toy,wine...
Step Three: Put excited {now overtired} toddler in the car where she proceeds to stiffen her body into a straight line so you can now not put her in the car. We've forgotten Penelope {beloved stuffed bunny}. Get Penelope. Put toddler into her carseat where she stiffens herself again and flips around, now hanging over passenger seat demanding the bag of pretzels she sees on the floor. Note to self: bring pretzels into the house. Give toddler a pretzel for each hand, buckle and proceed to drive down the street.
Step Four: Forget your Target list. Try to remember what you needed. Peanut butter? Mayo? Lettuce? No, maybe it was paper towels? What food do we even eat? Peanut butter. Don't forget the peanut butter.
Step Five: Sing along with your toddler to Christmas songs while trying to get to Target before a nap happens.
Step Six: Arrive in Target parking lot after approximately 20 minutes of driving and singing. Toddler is asleep.

Step Seven: Sit in the Target parking lot for approximately 37 minutes while your toddler sleeps. Check Instagram, email, Target statement. Note to self: lay off the pointless "that is adorable!" things
Step Eight: "Hi Mommy" is whispered from the back seat. Ah, your toddler is awake and happy. Load her into a cart, complete with cart saver {ew, cart germs}, snack trap, and water. Attach Penelope with toy leash to cart saver. And we're off...
Step Nine: Use cart wipe. Head to dollar spot. Gets me everytime. Ok, we need the pack of jumbo Elmo crayons, oneor eight gold polka dot notebooks, gold chevron ribbon, Sofia the First coloring book, felt Santa bucket and chalkboard gift bag, Realize you've already spent 12 minutes in the dollar spot.

Step Ten: Head towards baby aisle. What did I need? Wipes? Diapers? Ooh, look...new Tommee Tippee cups. Add to cart. Go back for wipes. Spot adorable dress for Christmas card picture. Think to yourself if you have anything to coordinate. "Mommy, Mommy, Mommy," as toddler is pointing to food pouches. Grab one from your diaper bag and hope Target employees realize you did indeed bring your own.
Step Eleven: Toddler squirts organic sweet potato and apple pouch down the front of her jacket. Take out wipes, wipe her down, take away pouch as toddler screams because you took pouch away. Give pouch back, "Mommy do."
Step Twelve: Why am I here?? What did I need?
Step Thirteen: Cruise past toy aisles, trying to find the 50% off toy from Cartwheel today. Explain to toddler that we can't have that right now.
Step Fourteen: Head to Christmas aisle. Take a picture of your child in front of Christmas display. Have a stranger come up and offer to take a picture of you and your child. Sure, why not? I'm only standing in the middle of Target with people looking at me, because why would I take a picture in front of a fake tree at Target? Thank stranger and head to Christmas music aisle.


Step Fifteen: Play Christmas music sample CD while toddler dances in cart and give her an adorable ornament to play with.


Step Sixteen: Head to the food, that you're actually here to buy. No, we can't eat those crackers now. Break out the different goldfish and mix with Cheerios, just incase.

Step Seventeen: Zip through food aisles because toddler is getting tired and hungry and ready to get out of cart. Sit down please. Sure, you can hold the can of beans.
Step Eighteen: Make your way to the frozen fruit section. Maneuver your cart so your toddler doesn't see you putting it into the cart. Toddler sees the fruit. Quickly try to distract, finding the toys in your diaper bag. Nope. Calm toddler who is now crying. Explain that you can't open the frozen fruit right now. Yup, because she totally understands that.
Step Nineteen: You're now running down the aisles. "We're almost done." "We're going to go home soon." "You're being such a good girl"

Step Twenty: Head to check out. Give toddler the box of crayons you found in the dollar spot. Put all of your items on the checkout, open your Cartwheel app. Think to yourself, why is the cashier laughing? Look at toddler. Contain yourself when the tip of the orange crayon is missing and see your toddler happily chewing away. Swipe your toddler's mouth and find a teeny tiny piece of orange crayon, the rest is packed into her molars. Smile at the teen cashier and joke that you don't need to feed her lunch now. Teen politely laughs. Mom fail. Scan cartwheel that you actually remembered to use, swipe card, get receipt and book it to the car.
After our shopping trip, my sister and Brynn met up with us to grab some pizza. After Olivia flipped her entire plate of freshly cut pizza, I kind of lost it. A few minutes later, the girls were feeding each other pieces of pizza and I was saying how sweet it was. My sister proceeds to say, "you were hangry, weren't you?' Yes, I was hangry. Hungry and angry. Pizza solves all sometimes, right?!
Overall, a successful trip. I seriously love my little shopper so much. Now, those of you without toddlers may as yourself, why? Why would you do that more than once? I too ask myself that at times. Then by next week, it's let's go to Target, so fun!
Final step: Drive home while toddler happily sings in the back seat. Peanut butter. I forgot the peanut butter...
This morning, I decided to take Olivia to Target to look at all of the fun Christmas items popping up, while of course doing some grocery and essentials shopping. Normally, Olivia loves shopping and it makes me so happy to share fun shopping days with her. I thought it might be fun to see if any of you have the same Target experience as me;)...
Step One: Decide to take your toddler to Target before naptime {insert monkey covering eyes emoji here}. Prep her with a big breakfast and get her excited to go with you!
Step Two: Prep your diaper bag with all of the essentials to make your shopping trip go smoothly...Cheerios, goldfish, raisins, snack trap with different goldfish, granola bar, water, mini book, light up toy,
Step Three: Put excited {now overtired} toddler in the car where she proceeds to stiffen her body into a straight line so you can now not put her in the car. We've forgotten Penelope {beloved stuffed bunny}. Get Penelope. Put toddler into her carseat where she stiffens herself again and flips around, now hanging over passenger seat demanding the bag of pretzels she sees on the floor. Note to self: bring pretzels into the house. Give toddler a pretzel for each hand, buckle and proceed to drive down the street.
Step Four: Forget your Target list. Try to remember what you needed. Peanut butter? Mayo? Lettuce? No, maybe it was paper towels? What food do we even eat? Peanut butter. Don't forget the peanut butter.
Step Five: Sing along with your toddler to Christmas songs while trying to get to Target before a nap happens.
Step Six: Arrive in Target parking lot after approximately 20 minutes of driving and singing. Toddler is asleep.
Step Seven: Sit in the Target parking lot for approximately 37 minutes while your toddler sleeps. Check Instagram, email, Target statement. Note to self: lay off the pointless "that is adorable!" things
Step Eight: "Hi Mommy" is whispered from the back seat. Ah, your toddler is awake and happy. Load her into a cart, complete with cart saver {ew, cart germs}, snack trap, and water. Attach Penelope with toy leash to cart saver. And we're off...
Step Nine: Use cart wipe. Head to dollar spot. Gets me everytime. Ok, we need the pack of jumbo Elmo crayons, one
Step Ten: Head towards baby aisle. What did I need? Wipes? Diapers? Ooh, look...new Tommee Tippee cups. Add to cart. Go back for wipes. Spot adorable dress for Christmas card picture. Think to yourself if you have anything to coordinate. "Mommy, Mommy, Mommy," as toddler is pointing to food pouches. Grab one from your diaper bag and hope Target employees realize you did indeed bring your own.
Step Eleven: Toddler squirts organic sweet potato and apple pouch down the front of her jacket. Take out wipes, wipe her down, take away pouch as toddler screams because you took pouch away. Give pouch back, "Mommy do."
Step Twelve: Why am I here?? What did I need?
Step Thirteen: Cruise past toy aisles, trying to find the 50% off toy from Cartwheel today. Explain to toddler that we can't have that right now.
Step Fourteen: Head to Christmas aisle. Take a picture of your child in front of Christmas display. Have a stranger come up and offer to take a picture of you and your child. Sure, why not? I'm only standing in the middle of Target with people looking at me, because why would I take a picture in front of a fake tree at Target? Thank stranger and head to Christmas music aisle.
Step Fifteen: Play Christmas music sample CD while toddler dances in cart and give her an adorable ornament to play with.
Step Sixteen: Head to the food, that you're actually here to buy. No, we can't eat those crackers now. Break out the different goldfish and mix with Cheerios, just incase.
Step Seventeen: Zip through food aisles because toddler is getting tired and hungry and ready to get out of cart. Sit down please. Sure, you can hold the can of beans.
Step Eighteen: Make your way to the frozen fruit section. Maneuver your cart so your toddler doesn't see you putting it into the cart. Toddler sees the fruit. Quickly try to distract, finding the toys in your diaper bag. Nope. Calm toddler who is now crying. Explain that you can't open the frozen fruit right now. Yup, because she totally understands that.
Step Nineteen: You're now running down the aisles. "We're almost done." "We're going to go home soon." "You're being such a good girl"
Step Twenty: Head to check out. Give toddler the box of crayons you found in the dollar spot. Put all of your items on the checkout, open your Cartwheel app. Think to yourself, why is the cashier laughing? Look at toddler. Contain yourself when the tip of the orange crayon is missing and see your toddler happily chewing away. Swipe your toddler's mouth and find a teeny tiny piece of orange crayon, the rest is packed into her molars. Smile at the teen cashier and joke that you don't need to feed her lunch now. Teen politely laughs. Mom fail. Scan cartwheel that you actually remembered to use, swipe card, get receipt and book it to the car.
After our shopping trip, my sister and Brynn met up with us to grab some pizza. After Olivia flipped her entire plate of freshly cut pizza, I kind of lost it. A few minutes later, the girls were feeding each other pieces of pizza and I was saying how sweet it was. My sister proceeds to say, "you were hangry, weren't you?' Yes, I was hangry. Hungry and angry. Pizza solves all sometimes, right?!
Overall, a successful trip. I seriously love my little shopper so much. Now, those of you without toddlers may as yourself, why? Why would you do that more than once? I too ask myself that at times. Then by next week, it's let's go to Target, so fun!
Final step: Drive home while toddler happily sings in the back seat. Peanut butter. I forgot the peanut butter...
Thursday, November 20, 2014
The winner is...
a Rafflecopter giveaway
Congratulations to Jamie! Please keep an eye out for an email from The Birds Nest! Thank you all so much for entering! Be sure to check out new Shop Features coming soon!
*Winner must claim prize within 24 hours*
Congratulations to Jamie! Please keep an eye out for an email from The Birds Nest! Thank you all so much for entering! Be sure to check out new Shop Features coming soon!
*Winner must claim prize within 24 hours*
Wednesday, November 19, 2014
We Painted || DIY Christmas Ornaments for Toddlers
I can feel Christmas is the air! I'm so excited for the holidays this year and everyday it's getting more and more festive around here. On Sunday, I went to church solo while my hubby stayed home with Olivia. When I got back, I found that he had made Christmas ornaments with her! It just warms my heart to see that... A) He found a baby safe recipe B) He thought about this little project on his own C) She loved it D) He cleaned up. Santa will be good to him this year :)

The biggest one is her handprint...love. He used this recipe here, which was basically a mix of cornstarch, baking soda, and water. I love how bright white and sturdy the ornaments came out. After the ornaments were cooked and cooled, we painted them using Crayola washable paint. We babysit my niece, Brynn, on Mondays so she joined in too! Brynn was definitely into it more, while Olivia was slightly concerned about getting messy. She is my child.
To prep them, we put my hubby's old t-shirts on them to avoid a painted clothes mess and set up their Ikea Latt table with newspapers to cover the surface. Perfect sized table that we use for everything! {Look under the DIY tab to see more pictures of customizing the table} Step #1...do not eat the ornaments before we can race to get the paint open.


Let me know if you try this! It was an easy, festive craft that can be enjoyed by all! What festive projects have you done lately? Are you planning a special holiday craft with your little ones?
The biggest one is her handprint...love. He used this recipe here, which was basically a mix of cornstarch, baking soda, and water. I love how bright white and sturdy the ornaments came out. After the ornaments were cooked and cooled, we painted them using Crayola washable paint. We babysit my niece, Brynn, on Mondays so she joined in too! Brynn was definitely into it more, while Olivia was slightly concerned about getting messy. She is my child.
To prep them, we put my hubby's old t-shirts on them to avoid a painted clothes mess and set up their Ikea Latt table with newspapers to cover the surface. Perfect sized table that we use for everything! {Look under the DIY tab to see more pictures of customizing the table} Step #1...do not eat the ornaments before we can race to get the paint open.
We also kept construction paper nearby, for those who grew tired of painting ornaments ;)
Overall, they came out so cute!! Both girls were proud to show off their ornaments when they were finished. We wrote their initials and year on the back so we can keep them as a keepsake through the years.
Subscribe to:
Posts (Atom)