Showing posts with label DIY. Show all posts

Thursday, October 16, 2014

We Painted || Baby Safe Finger Paint

I've been seeing recipes for baby safe finger paints popping up all over Pinterest and I decided to make my own for a day of painting with the munchkin.  Ok, maybe 4 minutes of painting with a toddler...even so, it was fun!  Here's how to make the paint:

1 cup of greek yogurt (I chose to use greek so it's not too runny)
Food coloring
Canvas or large piece of paper


That's it.  Seriously, so easy!  I chose to make pink and purple, but you could easily make tons of other colors, mixing and matching to your little one's bedroom or playroom if you're planning on hanging their masterpiece ;)  You can basically eyeball the 1 cup, using more or less depending on what size canvas you're using.  I highly recommend keeping baby wipes or paper towels close by.  It is definitely a messy project, but oh so yummy for yogurt loving babies.

We painted with her cousin, Brynn, and both babies were excited to start.  First time painter fail:  Painting on the grass.  Why did I think this was a good idea? Next time, I would definitely put down a sheet or paint inside.  Rookie move.  Although, props to myself for putting Olivia in one of my old t-shirts to protect her clothes.  Would recommend:)


She was very proud of hers.  Brynnie was hesitant at first, then sampled some and got into it ;)  *Look past the painting clothes* 


Once the painting was done and interest was lost, both babies continued to sample the paint...


I'd say it was a tasty little project ;)  Once they are finished painting, I went over the thicker areas with my finger, removing excess paint, to make sure it dries evenly.  


This was a fun, tactile activity for little one's. I'd love to know if you try it yourself!  Off to hang this little masterpiece ;) 


Friday, July 18, 2014

Life Lately & Ikea DIY

Life around here lately has been so much fun!  Olivia is constantly learning new things everyday and is now obsessed with her belly button.  She loves to show hers and mommy's hiding embarrasment everywhere she goes! The kid loves belly buttons...it's hilarious.  She also has been obsessed with stuffed animals, especially her new dog CoCo from Ikea.  Thank you to my hubby for that $5 find!


She was having tea with CoCo at her new Ikea Latt table that her grandparents gave her for her first birthday.  I wanted to add some personal touches to the table and customize it just for her.
I stained the table and chairs using Minwax in Dark Walnut 2716.  I also added fabric to the seats and love how it came out!


I also made one for my niece's first birthday and love how that came out as well.  For hers, I spray painted the table and chairs in a raspberry pink from Valspar and added fabric to the seats. Perfect little table and chairs for munchkins!


With all this beautiful weather lately, the babies have been enjoying themselves in Olivia's water table...I can't stand the cuteness! They love each other so much! 


For now, I'll leave you with sneak peek of the next post...A Colorful First Birthday!  


Have a wonderful day!


Sunday, November 24, 2013

DIY Sunday: Board and Batten

This is one of my favorite projects that we've done in the house so far.  It's easy and makes a huge impact.  To start, measure your wall and decide how big you'd like your wooden boards to be.  Our are approx. 3 inches and they're about 11 inches apart.  I've love to say we have it down to a science and act like we're pro-diyers...but we're not!  Basically eyeball it and see what looks good to you.  We use our local Lowe's to cut all the pieces and then start with laying out the boards on the wall first.

(Line up the boards along the wall)

Then using a nail gun, nail the wood pieces to the wall where you'd like them placed.  The first time we did this wall treatment we painted the boards first and the wall as well.  This time, we chose to nail the boards first and paint everything after...highly recommend!  Saves some serious time and paint.  We picked out a piece of molding and had it cut to the exact size of the wall and nailed that right at the very top of the boards.  After nailing, fill in the holes with some putty and then paint the wall and boards.  We chose a bright white color to make the board and batten really pop.  We did about three coats to really make sure it was fresh and bright.

(Fill in the little holes with putty)

(Paint the wall and boards white)
After a few coats of white paint, you'll get this...(we did two walls and having an almost 7 month old makes you forget to take finished pictures of both walls)


Basically Saturday morning and afternoon's worth of work and it brightens up the room!


Wall color is Matrix by Behr, a really nice greige...Happy DIY-ing!


Wednesday, March 2, 2011

Picture Walk: No Sew Rosette Pillow

Hello everyone!  This is a quickie picture walk for a no-sew rosette pillow! To begin:
{Measure for pillow size, leaving at least 1 inch on all sides}


{Turn inside out}


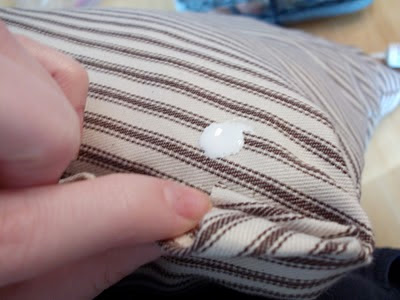
{Liquid Unique Stitch: aka no sew}


{Apply 1/2 inch in from cut side, repeat on 2 more sides}


{Insert pillow form and fold up the opening, apply unique stitch glue}


{Seal opening all the way}


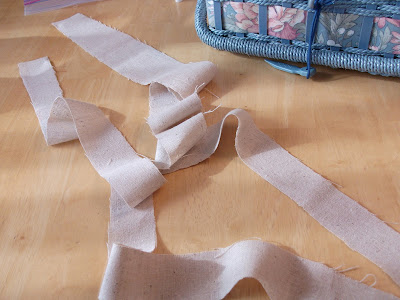
{Cut stripes of fabric, about 1 inch wide}


{wrap around finger to create rosette, this may take a few times to get the "rose" look}


{create more rosettes...}


{arrange in your letter or design of choice}


{arrange rosettes on pillow}


{apply unique stitch glue to back of rosettes, insert small pin to hold middle in place}


{admire your no-sew rosette pillow!}


Hope you can create your own no-sew pillows using this picture walk to help!!

Sharing with:


Saturday, October 30, 2010

Recipe Wreath!

A while ago, I saw this great tutorial over at Jones Design Company on a book wreath.   Such a cute idea!  I decided that I wanted to make mine for the kitchen area to bring some life to it.  As I've said before, right now we are renting so we can't change much physically, although our landlords completely renovated the kitchen and it's a wonderful change, but I thought adding the wreath would be a nice touch.  I basically followed Emily's tutorial & changed it ever so slightly.

These are the materials that you will need:


Old cookbook {I loved how it looked vintage with the yellowed pages}

Glue gun & glue sticks

Foam wreath {it looks small here, but it gets much bigger once the paper is added}

Satin ribbon & two pins


So lets get started...

First, rip out the pages of an old book.  I chose an old cookbook from my grandma to go along with the kitchen theme.  I loved how it had a vintage feel with yellowed edged and old-fashioned recipes.


Then after your glue gun has heated, fold the pages like this:


I varied each page going back and forth between the ripped edge and the yellowed edge.  I chose to glue the bottom pages together before gluing the whole page on the wreath. Once you fold the paper like what shown above, put little dabs of glue between each fold at the bottom where my finger is...then once the bottom is glued {it will look like a small paper fan} put glue on one side of the paper on the bottom like this (sorry so blurry):


Then push onto the wreath...


Continue around until it looks like this:


Now, flip it over so it looks like this:


Start your second layer by doing the same as above {gluing the bottom} and fold slightly to attach to the wreath like this:


Continue your way around for the second layer...


Watch out for glue gun burns! Ouchhh


Moving on to the next layer, do the same thing and overlap the second layer.  Since I was using a cookbook, I tried to vary pages by recipe titles and directions.


Once you are done with your third layer, it should look similar to this:


Side view, LOVE it


Then add a fourth and fifth layer and leave the bottoms hanging off slightly in the middle.  You will glue those to the back layer next.


and...


Now, turn the wreath over, and glue each of the front flaps back like this:


Flip it back over and fill in any areas that are looking a little bald :)


Now measure your ribbon for the correct height you need and add a pin to hold the ribbon in place


Then add another:


The final project, in all it's glory: 


{Don't look at the icky decorative titles}


I'm picturing it hanging in a beautiful window over the kitchen sink in our future home!

Hope you enjoy this!  If you create you own, I've love to see! These would work great for dining rooms (using music sheets), baby rooms (vintage baby books), family rooms, anywhere..Enjoy!!

Happy Halloween Eve!

Blogger template designed By The Sunday Studio.