Sunday, January 30, 2011

No Sew Pillows!

Hello Everyone!

Hope you are having a wonderful Sunday :)  I'm so excited to share these pillows with you! I had no idea what I was doing & the result turned out great ~ don't you love when that happens!  I'm sure many of you have seen the Ballard Design "Mr. and Mrs." pillows, here's a refresher:
{Ballard Design}
I loved them when I saw them, just the right amount of rustic.  I've seen other bloggers recreate these (so cute!) and I thought why not??  I also stopped into Home Goods the other day and admired their pillows, but the $50 price tag - I think not. Off to Joann Fabrics I went...

{If you do not have a fabric store near you, click on the link to Joann Fabrics above and you can order from their website!}

Okay, lets get started... here's what I used to create 2 pillows:


  • 1 yard of burlap-looking fabric
  • 2 pillow inserts (small - also found at Joann's or Ikea)
  • No Sew Glue
  • Silhouette machine or stencil equivalent
  • Fabric Paint
  • Small Paintbrush


I started my Ballard Design pillows by laying out the fabric, doubled to have a front and back with one cut and placed the pillow insert on top, leaving approximately 1 - 1 1/2 inches all around.  Again, no clue what I was doing... just trust me ;)... knock-off say whattt


...ya know just eyeball it ;)


Once those are cut, start with your stencils!  I used my new Silhouette machine, but you can use any type of stenciling method you have on hand.


I made the letters about 3" tall...


Tape the stencil to the fabric using any tape you have and try to center the letters where you would like them on the pillow.  I tried to stay in the upper middle part. I added a small sheet of waxed paper in between the fabric, which really helped the letters not to stick to the bottom piece.  Now, paint inside of your stencils using a small brush.  Only use a small amount of paint to create the rustic, stamped look...


  Remove the stencil after you are done painting, before paint dries


and continue with "Mr."...


now let dry side-by-side...awww...love.


now, the fabric paint states that you need to let the fabric dry for 4 hours...whatt?! I think not.  If you are impatient like me, let dry maybe 25-30 mins then check it out for tackiness.

After they are "dry," apply a thin line of glue about a 1/2 from the edge and leave about 1 inch at the top of the fabric:

Do the same to the other side, leaving the top of the fabric open to slide pillow insert in.  Let dry inside out for at least 15 minutes on the dining room floor a flat surface:


When the glue is dry (or strong enough to not pull apart) turn the covers inside out again, right side in...whatever...just the right way with the words on the front :)


Slip in the pillow insert...


and you are left with some excess fabric, so I just folded it up nicely to close the seam and glued it shut like this:


and there you have it!  Easy right?? I love them...


Hope you've enjoyed this tutorial: now go make your own no sew knock-offs!!

Linking to these lovely parties:


UndertheTableandDreaming


Weekend Bloggy Reading


Funky Junk's Saturday Nite Special


Sneak Peek...

For all of you night owls... here's a sneak peek of what I created today:

... tutorial coming tomorrow!!


Thursday, January 27, 2011

Thank you Thrifty Decor Chick!

Sooo excited to see that The Birds Nest was featured as a newbie at Thrifty Decor Chick!!!  Go check it out here!!

Three of my fav projects were featured:

{Found here}

{Found here}

{Found here}

Wednesday, January 26, 2011

Not going to Blissdom Partayy

Hi All!

Stop over at Amanda's Serenity Now to meet other bloggers! What a great idea ~ Thanks Amanda!

Photobucket


Tuesday, January 25, 2011

Guest Bedroom/ Man Cave Inspiration...

*Warning: opinions are solely my own, unlike my hubby who likes to claim this space as "his own"*

Well, I have a confession...

I hate our guest bedroom man cave.  Hate is a strong word... so maybe lightly hate... but hate is still in there.

I love every other room in our home, but that "man cave." Why you ask??  Well I'll let you see for yourself:


Well there it is.  It's out there... for all the blogging world to see.  I love the other rooms in our home (still renting) - although I am still constantly thinking of other things I can do... but I'm waiting until we own our own home to go crazy!

Now, where to begin?  We bought the corner entertainment center and refinished it, which opens the room up more than our old wall piece.  The recliner and couch were given to my hubby by my parent's friends (thank you!) when he was living the bachelor life in his old apt.  The rug was a score from Bed, Bath and Beyond for around $15.  The uniforms in a huge pile - courtesy of my hubby.  The laundry baskets, pillows, cat supplies, etc... thrown in there for fun...

This is really the only piece I looove (unfortunately it's hiding in this room until we have space for it somewhere else)... we found it at a garage sale for $40 and it's an authentic trunk over 90+ years old!!


I just don't know where to start.  I don't want to spend a ton of money - well let's face it... we don't have the money to spend right now.  It's kind of an awkward space to fit furniture in, but I'd like it to be more functional... and pretty organized.  Any suggestions would be great, hopefully I'll have a post down the road showing a wonderful transformation ;)  We all can dream right?


Tuesday, January 18, 2011

New Blog? {opinions wanted!!}

Wow it has been a while since I've posted! Since New Years day I've been sick off and on...boo...but I've been reading my favorite blogs daily and looove thinking up new projects and drooling over reading about new recipes.  OMG have you read The Pioneer Woman?! My sister reads her blog all the time and for me, it has been love since first click.  Her recipes sound sooo yummy!!  I have truly enjoyed decorating my new home and it's constantly a work in progress.  Whether it be decorating, organizing, cleaning, cooking, etc there's always something going on here at The Birds Nest.  That being said,  I'm thinking of creating a new "sister" blog.

Some of you may remember reading in previous posts that I used to be a teacher and due to budget cuts, I lost my kindergarten classroom and position.  The quick run down: graduated college, substitute teacher, maternity leave teacher, graduated with Masters, teachers aide, Kindergarten teacher, jobless.  I am currently subbing here and there and waitressing on the side.  Being newly married, I am thankful that my hubby has a full time job and I can be on his health benefits, but in hopes of buying a house one day - subbing and waitressing just isn't cutting it.  Again, I love love love being home, but being home isn't going to get us a 3-4br, 2.5 bath and a white picket fence.


I'm currently feeling lost as to what to do... I love teaching...I love decorating...I love blogging...

My mom suggested I create a "teaching" blog.  Ya know helpful hints, teaching techniques parents can use at home, articles, etc.  I'm sure some parents could use some magic techniques they could pull out at home to help their child with homework, projects, etc. It seems like a really good idea, but would anyone read a teaching blog??? Of course I would have my resume readily available incase it happens to bring about a teaching position crosses fingers (probably not posted on the blog... because let's be honest ya never know who is reading - ok like you would post your info?? nope) I could post about links to sites I've used as a teacher, grade-leveled book lists, and printable worksheets for parents to do with their children, etc... does this make sense to start???

I would really love any opinions - good, bad, indifferent... anything would be appreciated to get this blog rolling (or not). Thanks & have a great night!


Saturday, January 1, 2011

Hellooo 2011!

Happy New Year!


I've been sick & blog slacking for a little while now and I can't wait to get back into sharing more projects, recipes, stories, etc with all of you!  Hope you all had a wonderful holiday season with your families ~ Happy New Year!

Monday, December 20, 2010

Blog Swap: Featuring Crafty Cierra

Hey everyone! My name is Cierra from CraftyCierra. I am so excited to be here today! Let me tell you a little bit about myself...I love to create things, try new recipes, & plan parties, which is what my blog is all about! I love to share my ideas with others, in hopes that they may be inspired by them, as I have by all of your amazing blogs!
I do a Wild Wednesday Party every week, along with a feature. I pick someone from the party to feature the following week! So be sure to link up!
Here are a few of my projects I want to share with you today!
Most of everything I make, I also sell in my Etsy Shop. Stop by to see what I have. I also do custom orders. Right now I am selling Kids' activity books for only $1.99. The books have 25 different activites to do. You can get 10% OFF in my shop by using the code "Christmas1". I am also doing a giveaway right now at my blog. 1 Lucky winner will win a $30 Gift Certificate to CSN Stores.
Thanks so much for stopping by! Make sure to visit my blog for more fun ideas & tutorials!
Happy Crafting!
Cierra

Thanks so much for blog swapping Cierra!

Friday, December 17, 2010

Wrapping gifts...again?

Would it be crazy if I unwrapped all of my Christmas presents to my hubby and family only to wrap them again?? Everyone has at least one crazy holiday moment (right?!) and this might just be mine :) After seeing all of these:


...I might just be unwrapping other people's gifts today, because these sure stand up my green subway art merry christmas paper. Another reason for this insane holiday moment  change of plans are these cute little gift tags found here.  Emily at Jones Design Company designed these gift tags that are freebies!! Yay! She is the inspiration to many of my projects such as my painted wallpaper and my recipe wreath

Anyway...is that crazy to rewrap everything?!...we'll see what the day brings :)


Thursday, December 9, 2010

Decking the Tree!

Whew...it's been a little while since I've posted...lots of decorating here at The Birds Nest!  We actually have two trees this year ~ one real one and one artificial that my hubby had from last year.

While my hubby was at work one night, I set up the fake tree in our bedroom... quite the surprise when he got home :)  I decided that I wanted that tree to be the home to all of our traditional, mismatched, different color, etc ornaments.  It looks really nice and it's a nice mix of yours, mine, and ours :)

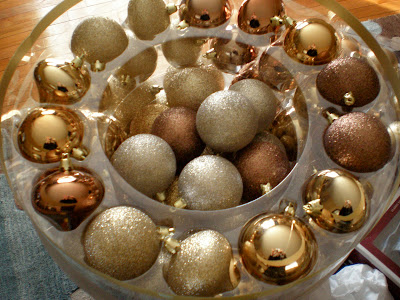
The real tree is in our living room, which has blues, browns, and tans. You can image my hubby's face when I said there would be NO reds, greens, etc. on the real tree!! I found these beautiful ornaments at Sam's Club...I know! 100 shatterproof ornaments in gorgeous bronze, golds, silvers... absolutely love them....


The larger ornaments were a few layers down and they were the exact color I was looking for!  I also picked up a few blue ornaments from Walmart that were equally as sparkly.  

First, my hubby and I laid everything on the table so we could see what we were working with:


It doesn't look like much here, but boy is this tree dripping!  The little birds came from Macy's 50% off :) Snowflakes & gold ornaments from Target and the Dollar Tree, bead strands from Michael's.  Have you checked out the Dollar Tree lately?? They have so many sparkly ornaments and you would never know they were only a $1!

Here we go...


...and truly sparkly at night...the real thing is much more beautiful in person!


Ahh...I wish you could see it in person...looove it!

I also put together a hot cocoa station. I saw this cute idea over at My Sweet Savannah. This is definitely one of my favorite Christmas ideas!

The apothecary jars are from Home Goods and T.J. Maxx...


I made the little glass holding the candy canes by gluing a Dollar Tree glass and candlestick holder together using Gorilla Glue. I think it came out nicely!


I added a little snowflake hanging from ribbon, both from the Dollar Tree


Hope you enjoy this post! More Christmas decor at The Birds Nest coming soon!


Blogger template designed By The Sunday Studio.